Frequently Asked Questions
A: During the first 30 days after your purchase - if the product has any defects or does not meet your expectations for fit, comfort or sound quality, you can return it for a full refund or like product exchange. Refunds are based on price paid and will be paid in the same form as the original payment; if by credit card, the refund will be credited directly to the credit card used; if payment was by check, a check will be issued.
- A 90-day repair warranty is in effect to cover defective parts, materials or workmanship. Product must be returned to Blue-Gear or an authorized repair facility within the 90-day warranty period.
- Warranty repairs will be at no charge and will meet the original specifications or be replaced with a new product.
- The warranty period begins at the date of original purchase, confirmed by proof of purchase.
- An extended 9-month warranty is available for $29.99. This additional coverage must be purchased during the first 90 days on the Blue-Gear web site.
- The warranty period begins at the date of original purchase, confirmed by proof of purchase. Product being returned must be in original packaging.
- If failure is caused by abuse of the product - including: water/moisture damage, heat exposure, pet chewing, earwax buildup or battery acid corrosion.
- When the unit has been opened and / or tampered with, it is not covered.
- Fitting tips & batteries are regarded as consumables and not covered.
- Product with a working battery or connection to a power source that appears dead (no sound) or intermittent (sound comes & goes).
- Any defects related to defective electronic components, workmanship or software.
- Blue-Gear ships via FedEx. If Fed-Ex service is not available we will ship via USPS.
- Shipping and handling charges are $19.99.
- Standard process time for new orders and repairs is 3 working days
- Larger order may take additional time
- If additional time is needed we will notify you via e-mail or phone
- Expediting of order is available upon request and charged accordingly.
- When product is returned for credit, shipping & handling fees are non-refundable.
- Product needing warranty work must be shipped in its original packaging as all products have a serial number found on the unit & packaging.
- Blue-Gear accepts no loss or damage liability on customer's shipments to Blue-Gear.
- Customers should ensure shipments are properly packed & insured before sending.
A: PSAP stands for Personal Sound Amplification Product. A PSAP is used to enhance your natural hearing when you want a little extra boost.
Your Crescent uses a 10A battery. Please use brand-name batteries because they vary in size. Not all batteries are the same even if they are labelled as the same size. Some offbrand batteries are literally a millimeter or two larger than name-brand batteries.
Pulling off the plastic sticker activates the battery. Do not pull the tab off until you need to use the battery. The batteries may take up to 2 minutes to fully air activate when the tab is removed.
Check to make sure no adhesive is remaining on the battery blocking the activation holes. Rub the battery on the flat side with your finger to remove any debris and activation should occur. Also make sure wax is not blocking the end of the sound tube and tip.
Note: Because of their small size, it is recommended you insert or remove batteries on a table or desk to reduce the risk of dropping the instrument or battery.
Step 1
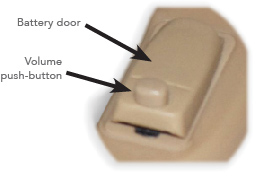
Using your fingernail, gently pull up on the battery door tab until the door swings open. Do not push against the volume button. Do not open the battery door too far or damage may occur.
Note: The rounded side of the battery is negative and the completely flat side is positive. The flat side (+) needs to be on the doors red dot side.
Step 2
With the red dot of the battery door facing you, hold the battery with the rounded edge positioned towards the back, place the flat top part of the battery under the doors front lip. Tucking the battery under the front edge motion will allow the bottom of the battery to slide into the door fully.
Caution: Proper installation of the battery is very important; incorrect installation of the battery or forcing the battery door shut with the battery inserted incorrectly may result in breaking the battery door.
Step 3
With the battery installed, close the battery door to turn the device on. To turn off the device and to prevent battery use when not in use, gently pull the battery door open.
Step 4
To remove the battery, reverse the installation process. With the battery red door dot facing you, slide the bottom of the battery towards you. This will allow the battery to move from under the front lip.
Please dispose of used batteries in an environmentally friendly way. Do not place batteries in your mouth. If swallowed, contact your physician immediately or call the National Battery Hotline at 1-202-625-3333.
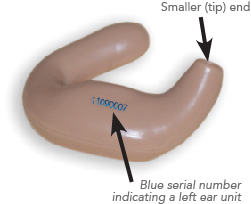
Look for the serial number located on the back. A blue serial number indicates that it fits only a left ear and a red serial number indicates that it fits only a right ear.
 Place the unit in the ear using your thumb and forefinger. Insert the smaller (tip) end first. Then turn/twist the top part into the ear.
Note: Using the mirror is helpful.

 Once the battery is inserted the unit turns on and automatically goes to the lowest volume level.